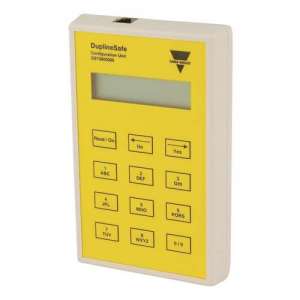
GTU8, Test Unit Model GTU8, GTU8, Test Unit for Dupline equipment and networks. Control and display unit with LCD display. Well suited for commissioning, troubleshooting and maintenance of the Dupline system, GTU8, GTU8 is the 128 channel portable receiver/transmitter unit powered by the Dupline. The GTU8 can be used anywhere on the Dupline to monitor and control the status of the Dupline channels. The GTU8 is very useful for commissioning and maintenance of Dupline systems. The GTU8 unit starts up automatically as soon as it is connected to the Dupline. The GTU8 can operate in 6 different modes: Digital 1 Group Digital 2 Groups Edit Tx-latch Analog BCD Ent./Exit. split Sensor Calibration (cali) The start-up mode is "Digital 1 group". To change the mode: 1. Press "Mode" 2. To change from one mode option to another, press "↑" or "↓". 3. Select the mode by pressing "Enter". Digital 1 group Once the GTU8 is connected to the Dupline, the GTU8 display will show the status of the channels (1, 2, 3 ...7, 8) in Group A. The active channels will be indicated by the channel numbers. The active channels will be indicated by their numbers (1, 2, 3...7, 8), with the GTU8 acting as a receiver. Pressing the keys "1", "2", "3" ... "7" , "8" will activate the Dupline channels corresponding to the selected channel group (A, B, C ...O, P), making the GTU8 the transmitter function. Pressing "↑" or "↓" will change the channel group (A, B, C ...O, P) shown on the display. Digital 2 Groups When this mode is selected, "Digital 2 Groups", you can select two Groups (A, B, C ...O, P) of channels to work with from the GTU8, with one of the selected Groups the GTU8 will work as in the case of "Digital 1 Group" (Transmitter and receiver) and with the other additional Group you will only work with the receiver function. Press "Mode" 2. Press "↑" or "↓" until "Digital 2 Groups" is selected. 3. Press "Enter". 4. Press "↑" or "↓" to select the Group (A, B, C ...O, P) of channels that you want to work as receiver (only the status of the channels in the Group will be displayed, you cannot activate the channels in this Group) 5. Press "Enter", this Group of channels will be displayed at the bottom of the GTU8 display. 6. Press "↑" or "↓" to change the channel group shown at the top of the GTU8 display, which will act as transmitter and receiver as in the case of "Digital 2 Groups" To change the additional channel group (receiver only), repeat the steps (1 to 5) above. Edit Tx-latch (Trigger transmission latching) In this mode, it is possible to "latch" the activation of one or more channels, i.e. the GTU8 will continue to transmit on those channels even if the key (1, 2, 3 ...7, 8) is not pressed. To cancel the transmission, simply press the corresponding key again. The latched transmission will continue even if the Channel Group or GTU8 operating mode is changed, to change the latched transmission status it is necessary to re-enter the "Edit Txlatch" mode and leave the corresponding channel unlatched. All latched channels are reset to normal Dupline operation mode when the GTU8 is disconnected from the Dupline. Analog BCD This mode allows the display of analog transmitter values using the 3 1/2 digit BCD format. Analog values are displayed as BCD numbers on the scale - 1999 to 1999. By pressing "↑" or "↓" the Group addresses can be changed, holding down the "Enter" key when pressing "↑" or "↓" will change the multiplex address. The display will indicate "Wait" until the multiplex address has been present on channels A1-A4. If no analog value is transmitted in the selected direction, the display will indicate: "None". If the analog value in the selected direction is not valid, the display will indicate "Error". If the multiplex address "OFF" is selected, the display will indicate the analog value transmitted in the selected Channel Groups regardless of the multiplex address; when analog transmitters are used in NON multiplex mode the "OFF" address must be selected. If a specific analogue transmitter is to be tested, its multiplex address can be set in "Edit Tx-latch" mode and then return to "Analog BCD" mode to display the value. Ent/Split Output In this mode it is possible to view the status of the Ent/Split Output channels. The top row (output) displays the outputs from the master generator to the Dupline units. The bottom row (input) shows the inputs from the Dupline units to the master generator. By pressing " ↑ " or " ↓ " the group addresses can be changed. Pressing "1", "2" ... "8" will activate the corresponding Dupline channel in the selected channel group. Sensor calibration (cali): The sensor calibration function is carried out in a sequence of steps. 1.To access the Dupline group function where the calibration channel is located, select: "SELECT SENSOR GROUP CALI: X" (X is the group number). Press enter when the desired group is selected. 2.When the Group is selected, select the channel within the group. "SELECT SENSOR CHANNEL CALI CHANNEL: XY" (X = Group number, Y = Channel in group X). Press enter when the desired channel is selected. 3.When the channel has been selected, an immediate status is entered: " PRESS ENTER TO CALIBRATE!" Press enter to begin calibration 4.When enter is pressed, calibration begins and a bar appears on the display showing the progression: "0%:************ ************:100%" Do not press anything else, the GTU8 unit will change status automatically. 5.When the calibration is finished, the following information will be shown on the display: "FINISHED! Pressing the mode button is the only way to restart the calibration or enter a new operating mode! Warning: Do not connect or disconnect the connector when the GTU8 unit is connected to the Dupline, this will short the two wires. Note: If the Dupline signal is lost, the display will not light up.

No customer reviews for the moment.
Or Insert your account information: